I’ve just built my first Hackintosh! This post will be a tutorial showing how I did it and why I chose the components I did.
Heads up, this is a long post. Take your time and follow the steps correctly however your milage may vary depending on your PC specs. Google is your friend when doing this.
TL;DR: I built a Hackintosh that runs Yosemite!
The specs of this PC are as follows:
- Intel Core i5 4430
- Gigabyte GA-B85M-HD3
- EVGA GTX 750
- 16GB RAM
- 120GB OCZ SSD
This tutorial/post has a number of steps from other websites. This isn’t a blog post that will work for every set up. You are building a Hackintosh, there will be issues setting it up so you need to take your time and not to rush. Solving issues and getting it all working is the fun part about it! As well as saving a lot of cash ;)
Why?
Why am I building a Hackintosh? Well, why not! I recently bought a 4K monitor (an Acer CB280HK for about £350 off Amazon) and was disappointed to see that my 13” Retina MacBook Pro wouldn’t run the screen at 4k at 60hz. It appears the Intel graphics chip only supports 30hz at 4k and to get 60hz working, you need a Mac that will support it. See this document from Apple. My current Mac (the 13” rMBP mentioned above) is only 3 months only and is very high spec (i7, 16GB, 512GB) so you can see why I was annoyed! If I had known the 13” wouldn’t have supported 4k, I wouldn’t have purchased it in the first place, but hey, we all make mistakes…
Another reason for me wanting to build a Hackintosh is to see how well it could be done and how well it performs. I use my Mac as my main machine these days for browsing the web, email and web development. I recently tried Xubuntu out a few months ago and found it very nice to use and I did use it for web development for about a month in a virtual machine on my gaming PC. I preferred the simplicity of the Mac as well as many programs that help with my development. Simple programs such as Sequel Pro don’t exist on Ubuntu. Another very useful tool that wasn’t present on Linux (because it’s made specifically for Mac) is Pow which makes it easy to run multiple Rails apps on the same machine using a .dev domain (e.g. my-site.dev).
Anyway, enough about why I chose to build a Hackintosh. Why did I choose the parts I did? One thing that you need to do a lot of when picking parts is research. One of my clients built a similar machine to run Xubuntu and was interested (after I said about it) to see if OSX Yosemite would run on it and how well. The motherboard is the same and is the main part to get right. If you choose Gigabyte motherboards & Intel CPUs it is pretty much 75% going to work. Gigabyte have always been renown in the Hackintosh community for making boards that work with the Mac OS.
Initial Setup
OK, to start with, you need a Mac. Yes, I know, but you need one in order to download OSX Yosemite from the Mac App Store. There are 2 apps to download:
- OS X Yosemite
- UniBeast & MultiBeast
For MultiBeast, download both the latest Yosemite version as well as this version. Yes, it is Mavericks and yes we do need it to run part of the installation.
For the installation, you will need a USB key with at least 7GB of space. Once all of the apps have been downloaded, run Disk Utility.
- Select the USB stick on the left hand side, e.g. “16GB Media”
- Select the Partition option on the right hand side of the window
- Under “Partition Layout”, select “1 Partition”, set the Format as “Mac OS Extended (Journaled)”
- The label can be set to anything. I’ve set mine to YosemiteInstall
- At the bottom of the window, click on the “Options” button and select the “Master Boot Record” option & click OK.
- Click Apply & then confirm. This will wipe the USB drive.
Once the USB stick is formatted with the correct file system, you can close Disk Utility and now open UniBeast which you downloaded earlier.
Upon opening, you will have to accept the license agreements.
- Continue > Continue > Continue > Accept
- Select your USB stick & click Continue
- Select “Yosemite” & click Continue
- Under “Select Support Options” don’t select anything & click Continue
- The next page will ask you to confirm the options. Click continue, enter your password
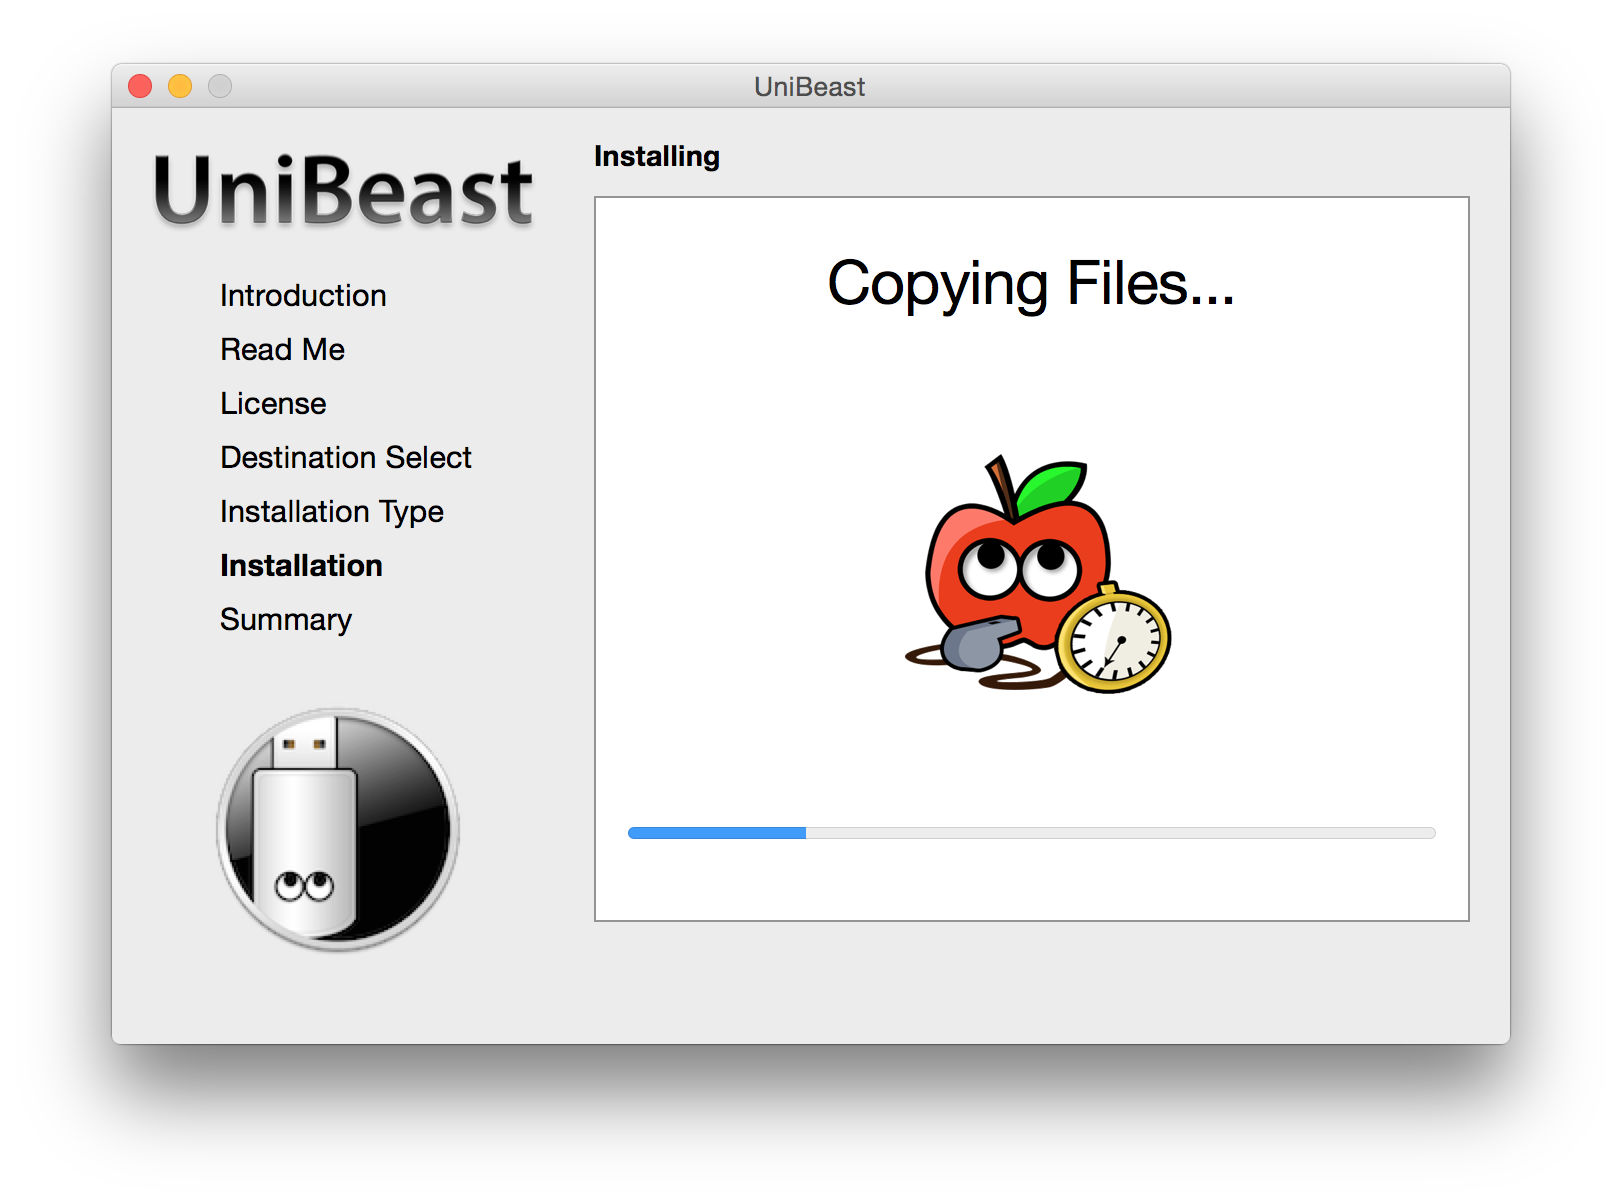
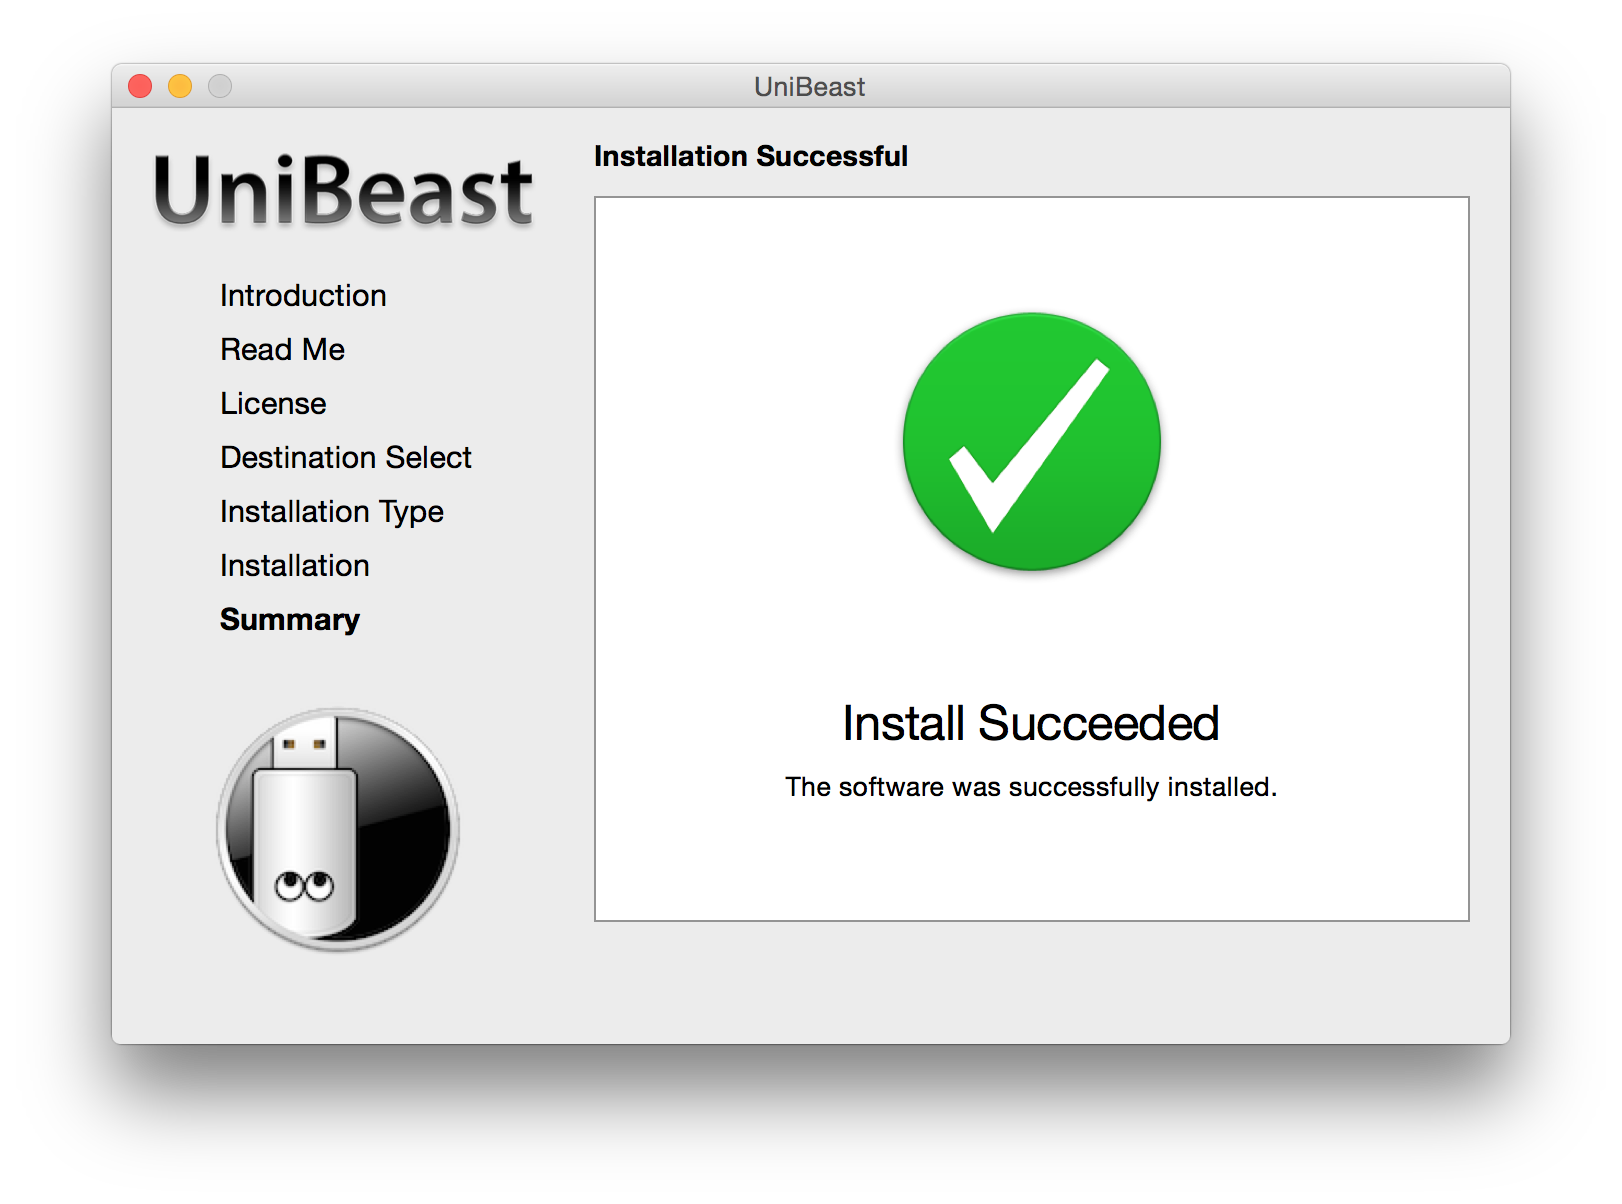
This will now copy the installation files for Yosemite, including extra boot software to the USB key ready for use. This will take a while so leave the USB stick plugged in and don’t close the UniBeast window.
You should see this window once it’s complete:
Copy the 2 MultiBeast files over to the USB key and we are ready to get started!
BIOS
Plug the USB stick you created earlier into a spare USB port and go into the BIOS of the PC. On this motherboard, it’s the DEL key that gets you in. Once, in there are a few options that need to be changed/disabled in order for Mac to work correctly.
- Press F7 to load Optimized Defaults
- BIOS Features > VT-d > Disabled
- BIOS Features > Windows 8 Features > Other OS
- Peripherals > SATA Configuration > SATA Mode Selection > AHCI
Because I’m using a Graphics Card and am also using it during installation, I found a few issues with the Intel integrated graphics so I’ve disabled them. Doing this allowed me to run the initial setup with the graphics card without it throwing an error.
- Peripherals > Intel Processor Graphics > Disabled
F10 to save & exit.
Installation
For this step we need to boot from the USB key. On this board, it’s F12 when the PC has POSTed. Choose your USB stick from the list and hit enter.
You should see a screen with a red Apple at the top and your USB key listed using the name you set earlier.
Type the following and hit enter:
-v nv_disable=1What does that mean?
-v= verbose modenv_disable=1= disables the built in Apple Nvidia drivers
You will see a lot of text scrolling down the screen. It will take up to a couple of minutes to go through it all.
Once it’s loaded, you should see a grey background & a drak grey loading bar along with a mouse pointer. After that, you should get the Yosemite install welcome screen. The graphics will be laggy at the moment because it is using the very basic display driver running at 1024x768.

- Select “use English…” & click the right arrow
- In the menu bar at the top, select Utilities > Disk Utility. This is the same program we used to wipe the USB stick.
- Select your hard drive (in my case SSD) on the left to show info about it. Select Partition and on the drop down choose “1 Partition”
- Set the Format to “Mac OS Extended (Journaled)” and click the Options button at the bottom. Select the “GUID Partition Table” option & click OK
- Name the drive something. I’m calling it Hackintosh.
- Click Apply and confirm. This will wipe the drive.
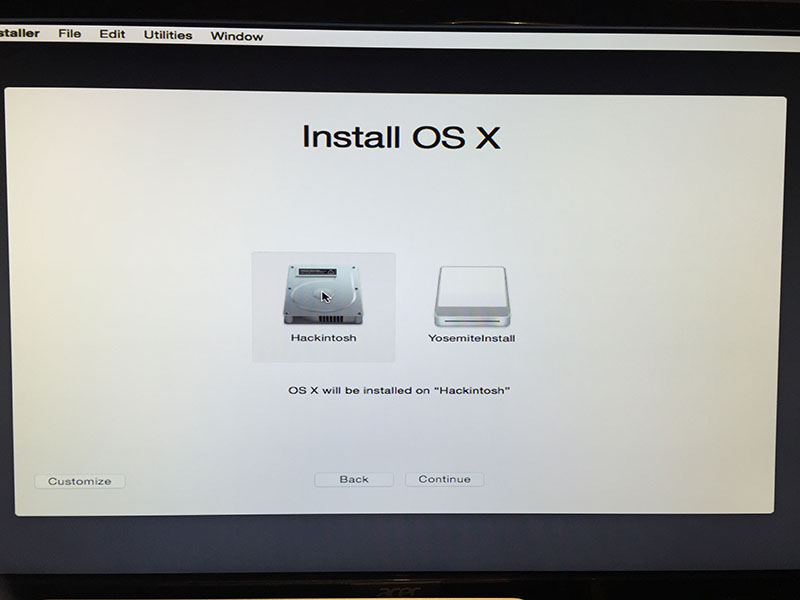
Once the drive is wiped, close Disk Utility and click “Continue” on the OS X window. Accept the license terms, after you’ve read them of course ;), and you should have 2 drives listed on the “Install OS X” page.
Select your drive and click Continue. This will start the install of Yosemite onto the selected drive.
This will take about 15-20 minutes depending on the specs of your PC & the speed of the USB stick.
Once the first install step is done, the PC will reboot, if it hasn’t done then you will need to boot from the USB stick again. Instead of choosing the Installer to boot from, choose the hard drive you installed it to (for me it’s Hackintosh) and type the following & hit enter
-v nv_disable=1As before, you’ll see a lot of text scrolling down the screen. You should then see a gray background with a dark grey progress bar like before.
Once that is complete…
- Choose your country & click continue
- Choose your keyboard layout & click continue
- “Don’t transfer any information now”
- “Don’t sign in” to iCloud or iTunes
- Accept the license terms
- Create a user account
Once you’ve run through the first setup after installing OSX, you will be greeted with the desktop. Nice!
Drivers & Software
Microsoft Windows operating systems use Drivers to help the hardware interact with the software. On the Mac OS, KEXTs are used. KEXT stands for Kernel EXTensions. Effectively, they are the same as drivers.
Once the initial setup is complete you will notice that the correct graphics driver isn’t installed as well as sound isn’t working. If a network cable was connected during installation then you may notice that the internet is working straight away however this is intermittent and sometimes doesn’t work on a reboot.
Copy the 2 MultiBeast files you downloaded earlier to the desktop. Extract the Yosemite zip file and run the MultiBeast app inside.
- Select “Quick Start” at the top and click “DSDT Free”
- Select “Drivers” at the top and choose the following options
- Disk > TRIM Enabler > 10.10.0 TRIM Patch
- Misc > USB 3.0 - Universal
- Network > Realtek > RealtekRTL81xx v0.0.90
- Disk > TRIM Enabler > 10.10.0 TRIM Patch
- Select “Bootloaders” at the top and “Chimera” should already be selected
- Select “Customize” at the top and change the settings required for your setup. The pre-set options should be fine.
- Click “Build” at the top and then “Install” at the bottom right
- Agree to the terms & enter your password & click “Install Helper”
This will take a few minutes and you may have a “kernel panic” (similar to a [BSOD] blue screen of death on Windows) or a lock up. I tend the wiggle the mouse pointer around to see if it locks up.
This sets up a few basics including installing a boot loader. Once that is complete, restart and remove the USB stick.
On a reboot you will be greeted with a screen similar to the bootable USB screen. Enter the same commands as before and hit enter:
-v nv_disable=1The -v isn’t required but it is handy to see if there is an issue while booting.
If it boots to the login screen then excellent!
The next part to complete is the graphics driver. NVidia support the GTX 750Ti in their latest “Web Driver” pack. This can be downloaded from the NVidia website. Download that file and run it. Continue through the install as you would normally and reboot at the end.
At the boot launcher screen (where we entered -v nv_disable=1 last time) enter the following & hit enter:
-v nvda_drv=1The nvda_drv=1 variable sets OS X to load the Nvidia Web driver which we just installed.
Don’t worry, you won’t have to enter this every time you boot the PC up. We will change the default graphics driver shortly.
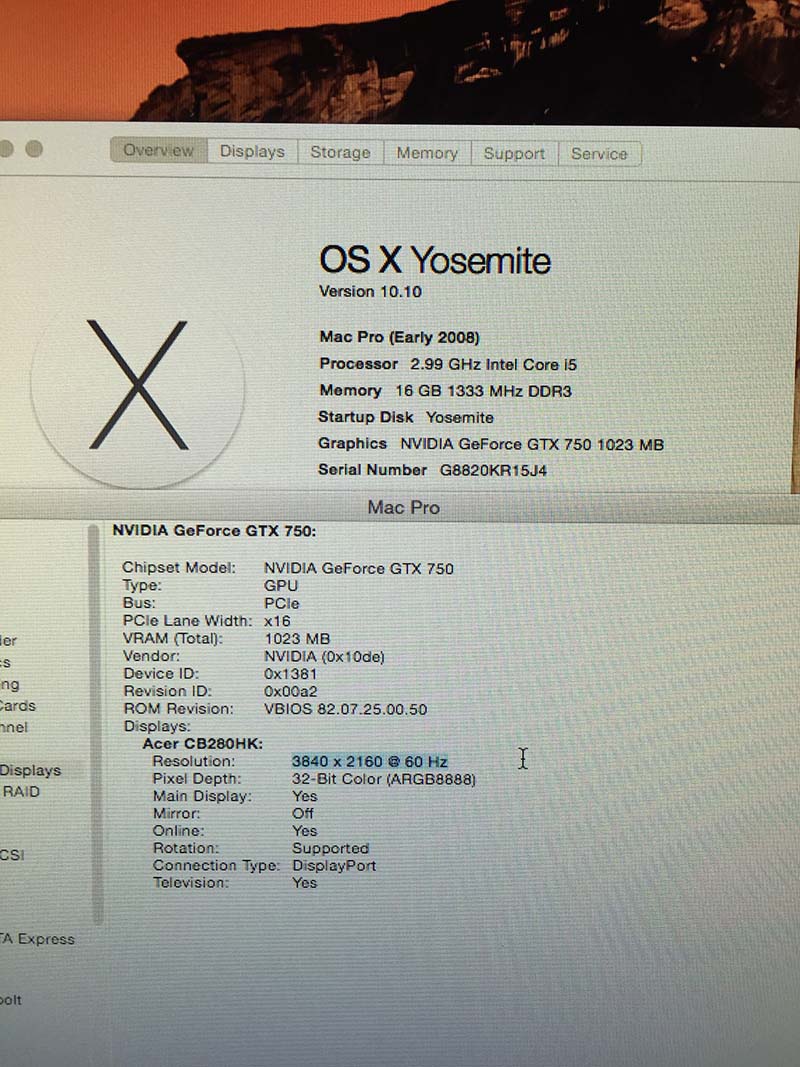
You should now have Yosemite running at the full resolution and colours of your screen. Big grin time! The moment of truth for me was opening “About This Mac” and seeing the correct graphics card listed under “Graphics”. under “System Report” then under “Graphics/Displays” on the left will show extra information about the screen. 3840x2160 at 60Hz. Oh yeah!
Open up “System Preferences” and then “NVIDIA Driver Manager”. Once in this section, click the lock on the bottom left and enter your password. Under the “Graphics Drivers” tab, select “NVIDIA Web Driver” and then click the Restart button.
Next up is sound. I had a lot of issues with trying to find the right KEXT for the sound chip on this motherboard and thankfully I wasn’t alone. I tried a number of ways of doing it but this is the way I finally did it.
Extract the MultiBeast Mavericks version you downloaded earlier and open the MultiBeast app. This will look the same as the newer version we used.
- Under “Drivers” at the top choose Audio > Realtek ALCxxx > Without DSDT > ALC887/888b Current v100302
- This should also check HDAEnabler in the same list
- Under “Build” at the top, click Install at the bottom right, agree and enter your password
Once the MultiBeast setup is complete, open Disk Utility, select your installation partition (in my case this is Hackintosh) and then under “First Aid” click the “Repair Disk Permissions” button. This will take a few minutes and you will see a lot of text in the box above.
Once Disk Utility has finished, close it and open System Preferences. Click on Sound and then on the Output tab. You should now see 4 options listed. Click the “Internal Speakers” option and you should now have sound! Open up iTunes, go to the store and play a couple of previews.
Oh yeah!
Complete!
You have now built a Hackintosh and have OS X Yosemite installed. Go you!